Ruby on Rails Authentication and Authorization Part 5
Created: 9 May 2012 Modified:In Part 1 of this series we described what we wanted our application to accomplish and installed gems we would need to work with. In Part 2 we generate our application framework and integrate Devise into it. In Part 3 we generate the MVC for roles and customize them to allow for building hierarchies. In Part 4 we customize Devise to integrate roles and users. This this part we will tie all of this together and emerge with a full blow authentication and authorization framework for any future applications.
- Ruby on Rails Authentication and Authorization Part 1
- Ruby on Rails Authentication and Authorization Part 2
- Ruby on Rails Authentication and Authorization Part 3
- Ruby on Rails Authentication and Authorization Part 4
- Ruby on Rails Authentication and Authorization Part 5
- myysecurity source
- Ruby on Rails Authentication and Authorization Update 3.2
- mysecurity 3.2 source
To paraphrase Clausewitz “No application design survives contact with reality.” The original design called for the use of declarative_authorization but we are going to be switching to CanCan for authorization. The reason for this is that declarative_authorization uses a static file to define roles and CanCan will allow us to define roles from a database. This will allow us to build permissions during runtime.
Since we are no longer using declarative_authorization and are using CanCan the CanCan gem needs to be installed and the Gemfile updated like so.
Terminal window in the mysecurity directory
bash-4.2$ gem install cancan
Fetching: cancan-1.6.7.gem (100%)
Successfully installed cancan-1.6.7
1 gem installed
Installing ri documentation for cancan-1.6.7...
Installing RDoc documentation for cancan-1.6.7...
bash-4.2$
mysecurity/Gemfile
source 'http://rubygems.org'

gem 'rails', '3.1.3'

gem 'sqlite3'
gem 'devise'
gem 'cancan'


=  Gems used only for assets and not required
=  in production environments by default.
group :assets do
  gem 'sass-rails',   '~> 3.1.5'
  gem 'uglifier', '>= 1.0.3'
end

gem 'jquery-rails'

group :test do
  gem 'turn', '~> 0.8.3', :require => false
end
Now that our Gemfile is in order we will want a table to store the permissions. The first step will be to design the table and update our database diagram as shown below.
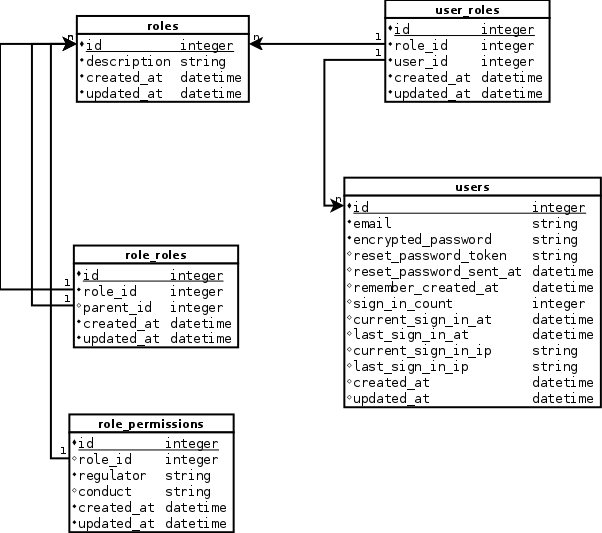
The design will allow us to assign controllers and actions to roles. Using Merriam-Webster’s thesaurus I used regulator for model and conduct for action. I did this to avoid any name conflicts that might occur in the Rails code. You might be confused because regulator is not a synonym for model. Before I understood CanCan I was going to use controller and action for permissions:) Our next step will be to generate the model as shown below.
Terminal window in the mysecurity directory
bash-4.2$ rails generate scaffold role_permission role_id:integer regulator:string conduct:string
      invoke  active_record
      create    db/migrate/20120410182942_create_role_permissions.rb
      create    app/models/role_permission.rb
      invoke    test_unit
   identical      test/unit/role_permission_test.rb
   identical      test/fixtures/role_permissions.yml
       route  resources :role_permissions
      invoke  scaffold_controller
      create    app/controllers/role_permissions_controller.rb
      invoke    erb
      create      app/views/role_permissions
      create      app/views/role_permissions/index.html.erb
      create      app/views/role_permissions/edit.html.erb
      create      app/views/role_permissions/show.html.erb
      create      app/views/role_permissions/new.html.erb
      create      app/views/role_permissions/_form.html.erb
      invoke    test_unit
      create      test/functional/role_permissions_controller_test.rb
      invoke    helper
      create      app/helpers/role_permissions_helper.rb
      invoke      test_unit
      create        test/unit/helpers/role_permissions_helper_test.rb
      invoke  assets
      invoke    coffee
      create      app/assets/javascripts/role_permissions.js.coffee
      invoke    scss
      create      app/assets/stylesheets/role_permissions.css.scss
      invoke  scss
   identical    app/assets/stylesheets/scaffolds.css.scss
bash-4.2$
With our table in hand we can define the relationship between roles and role_permissions.
mysecurity/app/models/role.rb
class Role < ActiveRecord::Base
  has_many :role_children, :foreign_key => 'parent_id', :class_name => 'RoleRole'
  has_many :children, :through > :role_children

  has_many :role_parents, :foreign_key => 'role_id', :class_name => 'RoleRole'
  has_many :parents, :through => :role_parents

  has_many :permissions, :foreign_key => 'role_id', :class_name => 'RolePermission'


end
What we will end up with is a Role edit page where the user can assign and remove permissions for a role. We will end up with something close to the screen below.
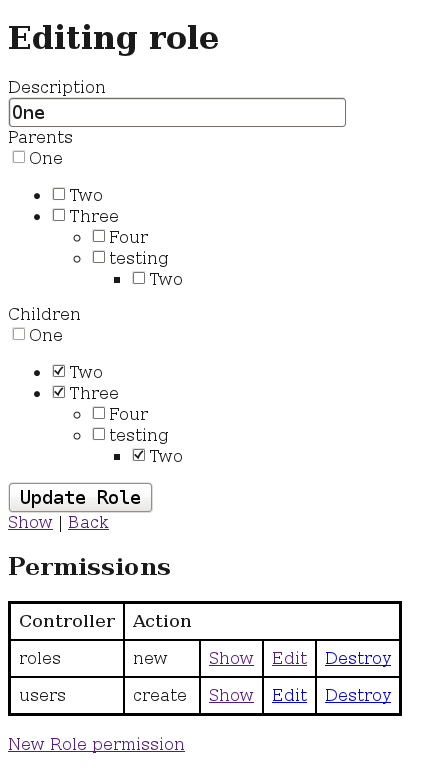
To accomplish this will require the modification and creation of several files. There were several pieces of advice on how to work with AJAX and rails in the world wide web. In the end the only method that worked well was to start from scratch using JQuery and figure it out. This is the path we will be going down today.
The first file we will modifiy is the application layout to include application JavaScript and CSS as well as controller specific JavaScript and CSS. This code follows.
mysecurity/app/views/layouts/application.html.erb
<!DOCTYPE html>
<html>
<head>
  <title>Mysecurity</title>
  <%= stylesheet_link_tag    'application' %>
  <%= stylesheet_link_tag    params[:controller] %>
  <%= javascript_include_tag 'application' %>
  <%= javascript_include_tag params[:controller] %>
  <%= csrf_meta_tags %>
</head>
<body>

       <p class="notice"><%= notice %></p>
       <p class="alert"><%= alert %></p>
      <div id="user_login_box" style="float:right">
      <% if user_signed_in? -%>
          <%= current_user.email %> |
          <%= link_to 'My info', edit_user_registration_path %> |
          <%= link_to 'Sign out', destroy_user_session_path, :method => :delete %>
      <% else %>
        <%= link_to "Sign up", new_user_registration_path %> or <%= link_to "sign in", new_user_session_path %>
      <% end %>
      </div>


<%= yield %>

</body>
</html>
Our next move will be to modify the Roles edit page to pull in via AJAX the Role Permission pages. We need for the role_permissions index page to load by default and to take the role_id as a parameter. We also need the edit and show pages to load into the page seemlessly. The majority of the code to support AJAX will be in the allPages.js file we will create. The code that follows is needed to make this happen.
mysecurity/app/views/roles/edit.html.erb
<script>
  $(document).ready(function(){
    defaultLocation();
  });

  function defaultLocation() {
    fillAjaxHolder('/role_permissions?role_id=<%= @role.id %>');
  }
</script>


<h1>Editing role</h1>

<%= render 'form' %>


<%= link_to 'Show', @role %> |
<%= link_to 'Back', roles_path %>

<h2>Permissions</h2>
<div id="ajaxHolder">

</div>
The main purpose of allPages.js is abstract the functionality out of a specific page so that I can reuse it with other pages when opportunity allows.
mysecurity/app/assets/javascripts/allPages.js
$.ajaxSetup({ cache: false });

function submitFormPost(theForm, theFunction ) {
  $.post(theForm.action, $("#" + theForm.id).serialize(),theFunction,'html');
}


  function fillAjaxHolder(theURL) {
    $.get(theURL,
      function(data, statusText, xhrObject) {
        $('#ajaxHolder').html(data);
      });
      return false;
  }

  function writeAjaxHolder(theContent) {
    $('#ajaxHolder').html(theContent);
    return false;
  }


  $(".ajaxDeleteLink").live('click',function(event){
    event.preventDefault();
    $.post(event.target,
    "_method=DELETE",
    function(data) {
      writeAjaxHolder(data);
    },
    'html');
  });


  $('.ajaxLink').live('click',function(event){
    event.preventDefault(); // Prevent link from following its href
    fillAjaxHolder(event.target);
    return false;
  });

  $('.ajaxSubmit').live('click',function(event){
    event.preventDefault(); // Prevent link from following its href
    submitFormPost(event.target.form,
      function(data) {
        writeAjaxHolder(data);
      }
    );
  });
This code expects the role_permissions controller to be able to handle a role_id parameter. Additionally we want it to return to the index page after a permission is the subject of a CRUD operation. Normally I would perform a redirect after these operations to permit problems during a page refresh. Since these pages are being pulled in via AJAX that will not be needed and we can render the index page after each operation. This is the primary purpose of the index_helper method. This also contains helper methods to load a list of all models and actions into JavaScript which will be used in the Role Permissions edit page. At the top of the controller we set “layout nil” so that the layout files will not be loaded. These two files are shown below.
mysecurity/app/helpers/role_permissions_helper.rb
module RolePermissionsHelper

  def index_helper
    if params[:role_id].nil?
      if params[:role_permission][:role_id].nil?
        log_error " role_id parameter is invalid!"
      else
        @the_role_id = params[:role_permission][:role_id]
      end
    else
      @the_role_id = params[:role_id]
    end

    begin
      @role_permissions = RolePermission.find(:all,:conditions => ["role_id=?",@the_role_id])
    rescue ActiveRecord::RecordNotFound
      log_error "record not found role_id=" + params[:role_id]
    end
  end

  def prepare
    Rails.application.eager_load!
    @roles = Role.all
    @regulators = get_models
    @conducts = get_actions
  end

  def get_models
    regulators = Array.new
    ActiveRecord::Base.descendants.each{ |model|
      regulators[regulators.length] = model.name
    }
    return regulators
  end

  def get_actions
    conducts = Array.new
    ApplicationController.descendants.each { |regulator|
      the_actions = regulator.action_methods
      the_actions.each {|the_action|
        conducts[conducts.length] = the_action
      }
    }
    return conducts
  end
end
mysecurity/app/controllers/role_permissions_controller.rb
class RolePermissionsController < ApplicationController
  layout nil
  # GET /role_permissions
  # GET /role_permissions.json


  def index
    index_helper

    respond_to do |format|
      format.html # index.html.erb
      format.json { render json: @role_permissions }
    end
  end

  # GET /role_permissions/1
  # GET /role_permissions/1.json
  def show
    @role_permission = RolePermission.find(params[:id])
    #authorize! :show, @role_permission
    respond_to do |format|
      format.html # show.html.erb
      format.json { render json: @role_permission }
    end
  end

  # GET /role_permissions/new
  # GET /role_permissions/new.json


  def new
    prepare
    @role_permission = RolePermission.new
    @role_permission.role_id = params[:role_id]
    respond_to do |format|
      format.html # new.html.erb
      format.json { render json: @role_permission }
    end
  end

  # GET /role_permissions/1/edit
  def edit
    prepare
    @role_permission = RolePermission.find(params[:id])
  end

  # POST /role_permissions
  # POST /role_permissions.json
  def create
    @role_permission = RolePermission.new(params[:role_permission])

    respond_to do |format|
      if @role_permission.save
        format.html {
          index_helper
          render :action => 'index'
        }
        format.json { render json: @role_permission, status: :created, location: @role_permission }
      else
        format.html { render action: "new" }
        format.json { render json: @role_permission.errors, status: :unprocessable_entity }
      end
    end
  end

  # PUT /role_permissions/1
  # PUT /role_permissions/1.json
  def update
    @role_permission = RolePermission.find(params[:id])

    respond_to do |format|
      if @role_permission.update_attributes(params[:role_permission])
        format.html {
          index_helper
          render :action => 'index'
        }
        format.json { head :ok }
      else
        format.html { render action: "edit" }
        format.json { render json: @role_permission.errors, status: :unprocessable_entity }
      end
    end
  end

  # DELETE /role_permissions/1
  # DELETE /role_permissions/1.json
  def destroy
    @role_permission = RolePermission.find(params[:id])
    @role_permission.destroy

    respond_to do |format|
      format.html {
        index_helper
        render :action => 'index'
      }
      format.json { head :ok }
    end
  end


  private :prepare
end
In the role_permissions controller you will see a reference to a log_error method which I defined in applicaiton_helper.rb as displayed below.
mysecurity/app/helpers/application_helper.rb
module ApplicationHelper
  def log_seperator
    return "***************************************************"
  end

  def log_error(message)
    logger.error(log_seperator);
    logger.error(controller_name + '.' + action_name + ":  " + message)
  end

end
Now that our controllers are in order we can modify our views to work with them. The default page to be displayed is the Role Permissions index and that is where we should start. The most important change here is that we have added CSS classes to the links so that the jQuery code in allPages.js can find and bind to the links. We will perform the same on the new, show and edit pages as well. These four files follow.
mysecurity/app/views/role_permissions/index.html.rb
<table class="showTableBorder">
  <tr>
    <th class="firstCell">Controller</th>
    <th class="lastCell">Action</th>
    <th class="lastCell firstCell" colspan="3"></th>
  </tr>
  <%  @role_permissions.each do |role_permission| %>
    <tr>
      <td class="firstCell"><%= role_permission.regulator %></td>
      <td class="middleCell"><%= role_permission.conduct %></td>
      <td class="middleCell"><%= link_to 'Show', role_permission, :class => 'ajaxLink' %></td>
      <td class="middleCell"><%= link_to 'Edit', edit_role_permission_path(role_permission), :class => 'ajaxLink' %></td>
      <td class="lastCell"><%= link_to 'Destroy', role_permission_path(role_permission,:role_id => role_permission.role_id), :class => 'ajaxDeleteLink' %></td>
    </tr>
  <%   end %>
</table>

<br />

<%= link_to 'New Role permission', new_role_permission_path(:role_id => @the_role_id), :class => 'ajaxLink' %>
mysecurity/app/views/role_permissions/new.html.rb
<h3>New Permission</h3>

<%= render 'form' %>

<%= link_to 'Back', role_permissions_path(:role_id => params[:role_id]), :class => 'ajaxLink' %>
mysecurity/app/views/role_permissions/show.html.rb
<h3>Show Permission</h3>
<p>
  *Regulator:*
  <%= @role_permission.regulator %>
</p>

<p>
  *Conduct:*
  <%= @role_permission.conduct %>
</p>

<%= link_to 'Edit', edit_role_permission_path(@role_permission), :class => 'ajaxLink' %> |
<%= link_to 'Back', role_permissions_path(:role_id => @role_permission.role_id), :class => 'ajaxLink' %>
mysecurity/app/views/role_permissions/edit.html.rb
<h3>Edit Permission</h1>

<%= render 'form' %>

<%= link_to 'Show', @role_permission, :class => 'ajaxLink' %> |
<%= link_to 'Back', role_permissions_path(:role_id => @role_permission.role_id), :class => 'ajaxLink' %>
<%= render 'javascript' %>
This leaves us with our _form.html.erb partial which is used by three of the proceeding files.
mysecurity/app/views/role_permissions/_form.html.rb
<%= form_for(@role_permission) do |f| %>
  <% if @role_permission.errors.any? %>
    <div id="error_explanation">
      <h2><%= pluralize(@role_permission.errors.count, "error") %> prohibited this role_permission from being saved:</h2>

      <ul>
      <% @role_permission.errors.full_messages.each do |msg| %>
        . <%= msg %>
      <% end %>

    </div>
  <% end %>

  <div class="field">
    <%= f.hidden_field :role_id %>
  </div>
  <div class="field">
    <%= f.label 'Controller' %><br />
    <%= collection_select(:role_permission, :regulator, @regulators, :to_s, :to_s)  %>
  </div>
  <div class="field">
    <%= f.label 'Action' %><br />
    <%= collection_select(:role_permission, :conduct, @conducts, :to_s, :to_s) %>
  </div>
  <div class="actions">
    <%= f.submit  (action_name.upcase == 'EDIT' ? 'Update' : 'Add') + " Permission", :class => "ajaxSubmit" %>
  </div>
<% end %>
The next files to modify are the application.js and application.cs assets.
Rails Assets are a subject all to themselves. Below are the modified files.
mysecurity/app/assets/javascripts/application.js
// This is a manifest file that'll be compiled into including all the files listed below.
// Add new JavaScript/Coffee code in separate files in this directory and they'll automatically
// be included in the compiled file accessible from http://example.com/assets/application.js
// It's not advisable to add code directly here, but if you do, it'll appear at the bottom of the
// the compiled file.
//
//= require jquery
//= require jquery_ujs
//= require allPages
mysecurity/app/assets/stylesheets/application.css
/*
 * This is a manifest file that'll automatically include all the stylesheets available in this directory
 * and any sub-directories. You're free to add application-wide styles to this file and they'll appear at
 * the top of the compiled file, but it's generally better to create a new file per style scope.
 *= require_self
 *= require tables
*/
As we can see the application.css file references a table.css file which needs to be added and is diplayed below.
mysecurity/app/assets/javascripts/application.js
/*
    Document   : tables
    Created on : Apr 19, 2012
    Author     : lynchcs
*/

.showTableBorder {
  border-style: solid;
  border-color: Black;
  border-left-width: .2em;
  border-right-width: .2em;
  border-top-width: .15em;
  border-bottom-width: .15em;

  padding: 0px;
  margin: 0px;
  border-collapse: 0px;
  border-spacing: 0px;
}

.showTableBorder td, .showTableBorder th {
  padding: .5em;
}

.showTableBorder tr {
  border-style: solid;
  border-color: Black;
  border-width: 0px;
  padding: 0px;
  margin: 0px;
}

.showTableBorder th {
  border-style: solid;
  border-color: Black;
  border-width: .05em;
  border-bottom-width: .1em;
}

.showTableBorder td {
  border-style: solid;
  border-color: Black;
  border-width: .05em;
}

.showTableBorder .firstCell {
  border-left-width: 0px;
}

.showTableBorder .lastCell {
  border-right-width: 0px;
}
Before proceeding further you should create one or two users. This can be done by going to http://localhost:3000/users/new . You can also do this by going to http://localhost:3000/user/sign_up. I used “test@test.com” for my user name and “tester” for my password.
With our users created we are ready to get to the heart of the matter! CanCan relies on a model called Ability to determine whether a user has permissions or not. This file can be generated as shown below.
Terminal window in the mysecurity directory
bash-4.2$ rails g cancan:ability
      create  app/models/ability.rb
bash-4.2$
We will then modify mysecurity/app/models/ability.rb to determine the permissions assigned to the user. We will do this by looping through the users roles and permissions.
mysecurity/app/models/ability.rb
class Ability
  include CanCan::Ability

  def initialize(user)
    user.roles.each { |role|
      role.permissions.each { |permission|
        can permission.conduct.to_sym, permission.regulator.constantize
      }
    }

  end
end
The last part is execute the authorization check in a controller. Remember we haven’t assigned any permissions to our user yet. Modify roles_controller.rb and change the show action to the following.
mysecurity/app/models/ability.rb
  def show
    @role = Role.find(params[:id])
    authorize! :show, @role

    respond_to do |format|
      format.html # show.html.erb
      format.json { render json: @role }
    end
  end
Start your application and login using the user account you created earlier. The results you should see is that you can see the index and edit pages but will receive an exception when you try to show a role. To automatically add the checks to all actions add “load_and_authorize_resource” to the top of the controller.
We now have a working authentication and authorization system. Since we are pulling the permissions from a database keep in mind that we have a chicken or an egg situation. We can’t use the interface to add permissions because we don’t have permissions yet. Your options are to remove the CanCan authorization checks long enough to add permissions or to go into the database directly and enter the necessary records.
tags: authentication - authorization - RoR - Ruby - Ruby on Rails