Ruby on Rails Authentication and Authorization Part 4
Created: 6 April 2012 Modified:In Part 3 of the series we modified the model and views generated by the Rails utilities to allow for creating hierarchical roles. In Part 4 we will perform almost the same series of steps to allow us to assign Roles to Users.
Our first step will be to use Rails to generate a model for your “user_role” linking table.
- Ruby on Rails Authentication and Authorization Part 1
- Ruby on Rails Authentication and Authorization Part 2
- Ruby on Rails Authentication and Authorization Part 3
- Ruby on Rails Authentication and Authorization Part 4
- Ruby on Rails Authentication and Authorization Part 5
- myysecurity source
- Ruby on Rails Authentication and Authorization Update 3.2
- mysecurity 3.2 source
Terminal window in the mysecurity directory
bash-4.2$ rails generate model user_role user_id:integer role_id:integer
      invoke  active_record
      create    db/migrate/20120302182538_create_user_roles.rb
      create    app/models/user_role.rb
      invoke    test_unit
      create      test/unit/user_role_test.rb
      create      test/fixtures/user_roles.yml
bash-4.2$ rake db:migrate
==  CreateUserRoles: migrating ================================================
-- create_table(:user_roles)
   -> 0.0010s
==  CreateUserRoles: migrated (0.0010s) =======================================

bash-4.2$
The generator will build the user_role.rb file as shown below.
mysecurity/app/models/user_role.rb (unmodified)
class UserRole < ActiveRecord::Base
end
We go ahead and modify the file to link UserRole to User and to Role.
mysecurity/app/models/user_role.rb (modified)
class UserRole < ActiveRecord::Base
  belongs_to :user, :foreign_key => 'user_id', :class_name => 'User'
  belongs_to :role, :foreign_key => 'role_id', :class_name => 'Role'
end
Below we have the User model that was generated by Devise for us.
mysecurity/app/models/user.rb (unmodified)
class User < ActiveRecord::Base
  # Include default devise modules. Others available are:
  # :token_authenticatable, :encryptable, :confirmable, :lockable, :timeoutable and :omniauthable
  devise :database_authenticatable, :registerable,
         :recoverable, :rememberable, :trackable, :validatable

  # Setup accessible (or protected) attributes for your model
  attr_accessible :email, :password, :password_confirmation, :remember_me
end
We will modify the user.rb file to add the relationship between User and Role. One difference here is that we need to add “:role_ids” to the list of accessible attributes. Only those fields of the model passed to “attr_accessible” will be updateable. This message “WARNING: Can’t mass-assign protected attributes: role_ids” led me to this discovery. Fortunately other developers had been there before me and had the answers!
mysecurity/app/models/user.rb (modified)
class User < ActiveRecord::Base
  has_many :user_roles, :foreign_key => 'user_id', :class_name => 'UserRole'
  has_many :roles, :through => :user_roles

  # Include default devise modules. Others available are:
  # :token_authenticatable, :encryptable, :confirmable, :lockable, :timeoutable and :omniauthable
  devise :database_authenticatable, :registerable,
         :recoverable, :rememberable, :trackable, :validatable

  # Setup accessible (or protected) attributes for your model
  attr_accessible :email, :password, :password_confirmation, :remember_me, :role_ids

end
Next we will use the Rails generator to build the scaffolding for the user model.
Terminal window in the mysecurity directory
bash-4.2$ rails generate scaffold_controller user
      create  app/controllers/users_controller.rb
      invoke  erb
      create    app/views/users
      create    app/views/users/index.html.erb
      create    app/views/users/edit.html.erb
      create    app/views/users/show.html.erb
      create    app/views/users/new.html.erb
      create    app/views/users/_form.html.erb
      invoke  test_unit
      create    test/functional/users_controller_test.rb
      invoke  helper
      create    app/helpers/users_helper.rb
      invoke    test_unit
      create      test/unit/helpers/users_helper_test.rb
bash-4.2$
In the following steps I alias devise to use the “user” path and set resources for the users controller in the routes.rb file.
mysecurity/config/routes.rb (unmodified)
Mysecurity::Application.routes.draw do
  resources :roles

  devise_for :users

  # Several comments omitted here in the center section.


  root :to => "home#index"

end
mysecurity/config/routes.rb (unmodified)
Mysecurity::Application.routes.draw do
    devise_for :users, :path => 'user'

    resources :roles
    resources :users


  # Several comments omitted here in the center section.


  root :to => "home#index"

end
My next step is to copy part of the contents of /devise/registrations/new.html.erb and create the file /devise/registrations/_user_fields.html.erb. This will allow me to include the fields in the /users/_form.html.erb file giving me one location to change the fields for three locations where it is used. The three files that need to be modified follow along with the _form.htm.erb.
/devise/registrations/new.html.erb/_user_fields.htm.erb
 <div><%= f.label :email %><br />
  <%= f.email_field :email %></div>

  <div><%= f.label :password %><br />
  <%= f.password_field :password %></div>

  <div><%= f.label :password_confirmation %><br />
  <%= f.password_field :password_confirmation %></div>
/devise/registrations/new.html.erb/new.htm.erb
<h2>Sign up</h2>

<%= form_for(resource, :as => resource_name, :url => registration_path(resource_name)) do |f| %>
  <%= devise_error_messages! %>

  <%= render :partial => 'user_fields' , :locals => {:f => f} %>

  <div><%= f.submit "Sign up" %></div>
<% end %>

<%= render "links" %>
/devise/registrations/new.html.erb/edit.htm.erb
<h2>Edit <%= resource_name.to_s.humanize %></h2>

<%= form_for(resource, :as => resource_name, :url => registration_path(resource_name), :html => { :method => :put }) do |f| %>
  <%= devise_error_messages! %>

   <%= render :partial => 'user_fields' , :locals => {:f => f} %>

  <div><%= f.label :current_password %> <i>(we need your current password to confirm your changes)</i><br />
  <%= f.password_field :current_password %></div>

  <div><%= f.submit "Update" %></div>
<% end %>

<h3>Cancel my account</h3>

<p>Unhappy? <%= link_to "Cancel my account", registration_path(resource_name), :confirm => "Are you sure?", :method => :delete %>.</p>

<%= link_to "Back", :back %>
/users/_form.htm.erb
<%= form_for(@user) do |f| %>
  <% if @user.errors.any? %>
    <div id="error_explanation">
      <h2><%= pluralize(@user.errors.count, "error") %> prohibited this user from being saved:</h2>

      <ul>
      <% @user.errors.full_messages.each do |msg| %>
        . <%= msg %>
      <% end %>

    </div>

  <% end %>
  <%= render :partial => '/devise/registrations/user_fields' , :locals => {:f => f} %>

  <div class="actions">
    <%= f.submit %>
  </div>
<% end %>
Now our next step is to add the functionality to the view that allows us to assign roles to users.
/users/_role_checkbox.htm.erb
. <%= check_box_tag "user[role_ids][]", current_role.id, @user.roles.include?(current_role), :disabled => current_role.eql?(@role) %><%= current_role.description %><%= the_children %>/users/_form.htm.erb
<%= form_for(@user) do |f| %>
  <% if @user.errors.any? %>
    <div id="error_explanation">
      <h2><%= pluralize(@user.errors.count, "error") %> prohibited this user from being saved:</h2>

      <ul>
      <% @user.errors.full_messages.each do |msg| %>
        . <%= msg %>
      <% end %>

    </div>

  <% end %>
  <%= render :partial => '/devise/registrations/user_fields' , :locals => {:f => f} %>
  <div class="field">
    <%= f.label 'Roles' %><br />
    <%=  build_role_list('/users/role_checkbox') %>
  </div>
  <div class="actions">
    <%= f.submit %>
  </div>
<% end %>
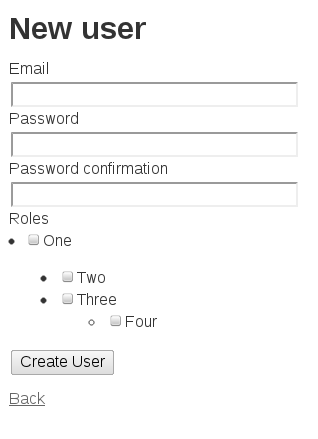
Start the application server using the “rails server” command and navigate to http://localhost:3000/users/new and you should see a screen similar to the screenshot below.

In Part 5 of this series we will finally pull all of the functionality together and secure our web application.
tags: authentication - authorization - RoR - Ruby - Ruby on Rails