Ruby on Rails Authentication and Authorization Part 3
Created: 28 February 2012 Modified:In Part 2 of this article we installed Devise and configured it so that we will be able to customize it. In Part 3 we will add the functionality for hierarchical roles.
Our first step will be to generate the roles and the role_roles tables we defined in Part 1. This can be done using the “rails generate” command as illustrated below.
- Ruby on Rails Authentication and Authorization Part 1
- Ruby on Rails Authentication and Authorization Part 2
- Ruby on Rails Authentication and Authorization Part 3
- Ruby on Rails Authentication and Authorization Part 4
- Ruby on Rails Authentication and Authorization Part 5
- myysecurity source
- Ruby on Rails Authentication and Authorization Update 3.2
- mysecurity 3.2 source
Terminal window in the mysecurity directory
bash-4.2$ rails generate scaffold role description:string
      invoke  active_record
      create    db/migrate/20120224180650_create_roles.rb
      create    app/models/role.rb
      invoke    test_unit
      create      test/unit/role_test.rb
      create      test/fixtures/roles.yml
       route  resources :roles
      invoke  scaffold_controller
      create    app/controllers/roles_controller.rb
      invoke    erb
      create      app/views/roles
      create      app/views/roles/index.html.erb
      create      app/views/roles/edit.html.erb
      create      app/views/roles/show.html.erb
      create      app/views/roles/new.html.erb
      create      app/views/roles/_form.html.erb
      invoke    test_unit
      create      test/functional/roles_controller_test.rb
      invoke    helper
      create      app/helpers/roles_helper.rb
      invoke      test_unit
      create        test/unit/helpers/roles_helper_test.rb
      invoke  assets
      invoke    coffee
      create      app/assets/javascripts/roles.js.coffee
      invoke    scss
      create      app/assets/stylesheets/roles.css.scss
      invoke  scss
      create    app/assets/stylesheets/scaffolds.css.scss
bash-4.2$
bash-4.2$ rails generate model role_role role_id:integer parent_id:integer
      invoke  active_record
      create    db/migrate/20120224181028_create_role_roles.rb
      create    app/models/role_role.rb
      invoke    test_unit
      create      test/unit/role_role_test.rb
      create      test/fixtures/role_roles.yml
bash-4.2$
I chose the “rails generate scaffold” command for the roles table because we will need a user interface to enter and edit the roles and this command builds the model, view and controller. The role_roles table will not need this so I used the “rails generate model” command to just build the model. Now I will use the “rake db:migrate” command to actually build the tables in the database.
Terminal window in the mysecurity directory
bash-4.2$ rake db:migrate
==  CreateRoles: migrating ====================================================
-- create_table(:roles)
   -> 0.0009s
==  CreateRoles: migrated (0.0009s) ===========================================

==  CreateRoleRoles: migrating ================================================
-- create_table(:role_roles)
   -> 0.0009s
==  CreateRoleRoles: migrated (0.0010s) =======================================

bash-4.2$
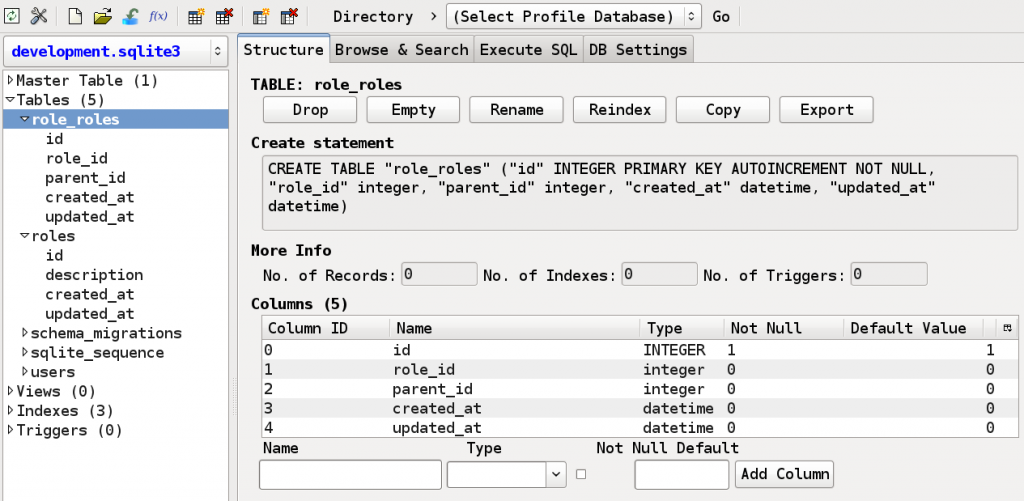
Now using the SQLite Manager we can look at the tables and we can see that the created_at and updated_at and primary key columns were automatically generated for us as illustrated below.

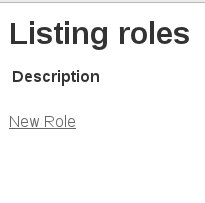
We should now run the “rails server” command and go to the URL http://localhost:3000/roles and verify that the scaffold for roles is working.
You should see something similar to the screen capture below.

Press Ctrl-c to exit out of the rails server running in the terminal. Now that we have verified that it is working let us begin our customization. If you recall one of the requirements from Part 1 is that we would have the ability to assign roles to other roles and this is the first part we will build. The first step is to customize the roles and role_roles models to define the relationships between the tables.
Each role will have the capability of having both children and parents. For Example Role A is assigned to Role B which in turn is assigned to Role C. Role B would have Role A as a child and Role C as a Parent. Now if we assign Role D to Role B then Role B will have both Role A and Role D as children. Furthermore if we assign Role B to Role E then Role B will have both Role C and Role E as parents. To allow this is the purpose of the role_roles table. Using the “has_many” method inside the models we will define the relationships. Below is the original role.rb model found in mysecurity/app/models directory followed by the modified version
mysecurity/app/models/role.rb
class Role < ActiveRecord::Base
end
mysecurity/app/models/role.rb
class Role < ActiveRecord::Base
  has_many :role_children, :foreign_key => 'parent_id', :class_name => 'RoleRole'
  has_many :children, :through => :role_children

  has_many :role_parents, :foreign_key => 'role_id', :class_name => 'RoleRole'
  has_many :parents, :through => :role_parents
end
This is the most confusing part in building this application and you may want to view outside resources to gain a better understanding. What we have done here is to first define a relationship to the RoleRole class and specify the foreign key that defines the relationship. Thus the parent_id column in role_roles points to the parent and if something is pointing to a parent it is a child. This is defined by the line “has_many :role_children, :foreign_key => ‘parent_id’, :class_name => ‘RoleRole’”. The next part says that a Role can have many Roles as children through RoleRole as shown by the line “has_many :children, :through => :role_children”.
To recap we said that Role has many RoleRoles as linked through the parent_id in RoleRole. We call this relationship “role_children”. Next we said that through “role_children” a Role can have many Roles and we will call this relationship “children”. Clear as mud? Good;)
The parent relationships are defined by the same process but in reverse. We say a Role can have many RoleRoles as linked by the role_id in RoleRole. We called this relationship “role_parents”. We then say that Role can have many relationships with Roles as defined through the “role_parents” relationship which we call “parents”. Through Ruby on Rails goodness ActiveRecord will build the parents and children collections onto the Role object for us. But wait! We let the Role model know that it has a relationship with RoleRole and with itself but we haven’t told RoleRole that it has a relationship with Role. Below is the original RoleRole model followed by the modified model.
mysecurity/app/models/role_role.rb
class RoleRole < ActiveRecord::Base
end
mysecurity/app/models/role_role.rb
class RoleRole < ActiveRecord::Base
  belongs_to :parent, :foreign_key => 'parent_id', :class_name => 'Role'
  belongs_to :child, :foreign_key => 'role_id', :class_name => 'Role'
end
Here we define both a parent and child relationship from RoleRole to Role. Thankfully this one is much easier to understand. RoleRole belongs to Role through the parent_id in RoleRole and the relationship is called “parent”. Additionally RoleRole belongs to Role through the role_id in RoleRole and this one is called “child”. Combined with the has_many relationships defined in the Role object are the relationships now fully established.
We have defined the relationships between our role tables and now we must be able to display, update and assign roles to roles. The default views defined using the “rails generate scaffold” command are not up to this task and must be modified. Roles can have both parents and children and we will need to display this information. My suggestion is that for the listing of the roles that we list all roles in the system and display them in a hierarchical fashion which will make the parent/child relationships obvious. When a role is being edited all the roles will be hierarchically displayed under a Parents and Children section. On to listing Roles!
The algorithm that I chose to use is to list all the roles that do not have parents and then to list the children. The code to implement this I will place in the Role helper class located “mysecurity/app/helpers/roles_helper.rb”.
mysecurity/app/helpers/roles_helper.rb
module RolesHelper

  def build_role_list(partialFile='')
    list_items = ""
    roleList = Role.find_by_sql("SELECT * FROM roles WHERE id NOT IN (SELECT role_id FROM role_roles)")
    for role in roleList
      list_items += build_role_list_item(role ,partialFile)
    end
    output = list_items
    return output.html_safe
  end

  def build_role_list_item(local_role,partialFile)
    local_children=""
    if local_role.children.length > 0
      child_output = ""
      for child in local_role.children
        child_output += build_role_list_item(child,partialFile)
      end
      local_children += render :partial => '/roles/ul', :locals => { :list_items => child_output.html_safe }
    end
    output = render( :partial => partialFile, :locals => {:the_children => local_children.html_safe,:current_role => local_role})
    return output.html_safe
  end

end
Next I edited the “mysecurity/app/views/roles/index.html.erb” and changed it to the following
mysecurity/app/views/roles/index.html.erb
<%= form_for(@user) do |f| %>
  <% if @user.errors.any? %>
    <div id="error_explanation">
      <h2><%= pluralize(@user.errors.count, "error") %> prohibited this user from being saved:</h2>

      <ul>
      <% @user.errors.full_messages.each do |msg| %>
        . <%= msg %>
      <% end %>

    </div>

  <% end %>
  <%= render :partial => '/devise/registrations/user_fields' , :locals => {:f => f} %>
  <div class="field">
    <%= f.label 'Roles' %><br />
    <%=  build_role_list('/users/role_checkbox') %>
  </div>
  <div class="actions">
    <%= f.submit %>
  </div>
<% end %>
I then edited the “mysecurity/app/views/roles/_form.html.erb” to the following
mysecurity/app/views/roles/_form.html.erb
<%= form_for(@role) do |f| %>
  <% if @role.errors.any? %>
    <div id="error_explanation">
      <h2><%= pluralize(@role.errors.count, "error") %> prohibited this role from being saved:</h2>

      <ul>
      <% @role.errors.full_messages.each do |msg| %>
        . <%= msg %>
      <% end %>

    </div>
  <% end %>

  <div class="field">
    <%= f.label :description %><br />
    <%= f.text_field :description %>
  </div>
  <div class="field">
    <%= f.label 'Parents' %><br />
    <%=  build_role_list('parents_checkbox') %>
  </div>
  <div class="field">
    <%= f.label 'Children' %><br />
    <%=  build_role_list('children_checkbox') %>
  </div>
  <div class="actions">
    <%= f.submit %>
  </div>
<% end %>
I then created three new files _indexrow.html.erb, _parents_checkbox.html.erb and _children_checkbox.html.erb. These are located in the “mysecurity/app/views/roles” directory. The files are called from inside the helper methods build_role_list and build_role_list_item. The underscore in the beginning of the file name indicates that they are partials. Their contents are displayed below.
mysecurity/app/views/roles/_indexrow.html.erb
  .
    <span class="roleDescription"><%= current_role.description %></span>
    <span class="roleCommands">[<%= link_to 'Show', current_role %> -
    <%= link_to 'Edit', edit_role_path(current_role) %> -
    <%= link_to 'Destroy', current_role, confirm: 'Are you sure?', method: :delete %>]
    </span>

  <%= the_children %>
</div>
mysecurity/app/views/roles/_parents_checkbox.html.erb
. <%= check_box_tag "role[parent_ids][]", current_role.id, @role.parents.include?(current_role), :disabled => current_role.eql?(@role) %><%= current_role.description %><%= the_children %>A tricky bit that I ran into with the checkbox tags has to do with the name inside the brackets. Handling multiple values with checkboxes is described very well in the HABTM Checkboxes on Railscasts.com. In the _parents_checkbox.html.erb file i placed the code “role[parent_ids][]” which works. However when I placed the code “role[role_ids][]” it didn’t work and threw an error. I was confused by this because I thought that “parent_ids” referred to the foreign key “parent_id” in the role_roles table and “role_id” would then be the other foreign key. This is not the case however. “parent_ids” is the singular of the relationship “parents” defined in the Role class “has_many :parents, :through => :role_parents”. The child relationship is defined as “has_many :children, :through => :role_children” and thus for the list of children “role[child_ids][]” defines the relationship for saving in the form. Which saves quite a bit of coding once you get the hang of it.
mysecurity/app/views/roles/_children_checkbox.html.erb
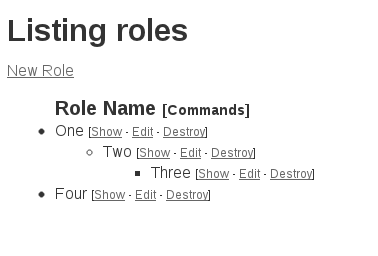
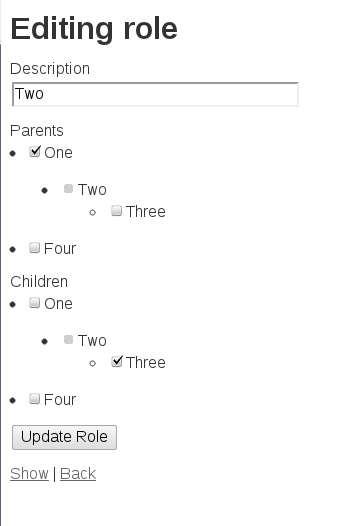
. <%= check_box_tag "role[child_ids][]", current_role.id, @role.children.include?(current_role), :disabled => current_role.eql?(@role) %><%= current_role.description %><%= the_children %>Now if we have put everything together correctly we should see screens similar to the below when we go to http://localhost:3000/roles.


We have covered quite a bit of ground in Part 3. In Part 4 we will integrate the Roles with the Users that was created in Part 2 when we configured Devise.
tags: authentication - authorization - RoR - Ruby - Ruby on Rails