Command Design Pattern Part 1
Created: 7 January 2013 Modified:Encapsulates a request as an object, thereby letting you parameterize other objects with different requests, queue or log requests, and support undoable operations.
Head First Design Patterns
We have the definition but what does it mean? Lets start with a drawing where the names have been changed to protect my sanity! The terminology used to describe the pattern did not lend itself to my learning. The original and my own lexicon is provided in the following list. As we go through the pattern remembering both terms will help us understand the pattern.
- Command Design Pattern Part 1
- Command Design Pattern Part 2
- SimpleCommand Source Code
- SimpleCommand Diagrams
Parts one and two of this article were developed using the Netbeans IDE 7.2 First the terms.
- Client (Controller) - This object orchestrates the other objects. It is the puppet master of the Command Design Pattern!
- Command - An object that encapsulates the command to be given and the functionality to perform said command.
- Invoker (Command Manager) - this maintains a list of commands and tracks what commands have have been executed. May also track undo and redo histories. Manages commands.
- Reciever (Command Target) - this is the object that the command acts on or changes. The “target” of the command.
The following drawing is the basis for the code in this article.
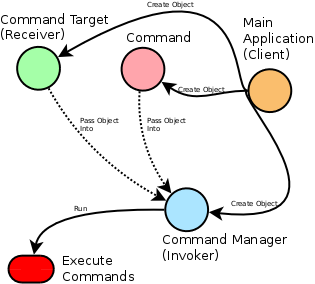
Our SimpleCommand program, aka the “client”, creates a command object, command manager object, and command target. The command and command target are passed into the command manager object. Then the execute method of the command manager is called. This method executes each command on the one command target. There is another option which is illustrated by the following drawing.
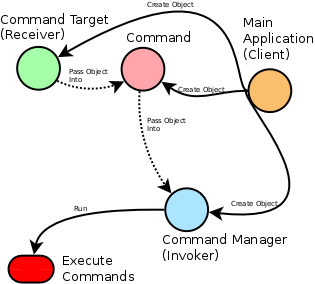
In this drawing the command target is passed into the command and then the command is passed into the command manager. The advantage of this design is you can have multiple targets and multiple commands and only one command manager. This is more than we need for our simple example. From this we can extrapolate the following class diagram. To be honest, I went right to the code and then came back and put the class diagram together.
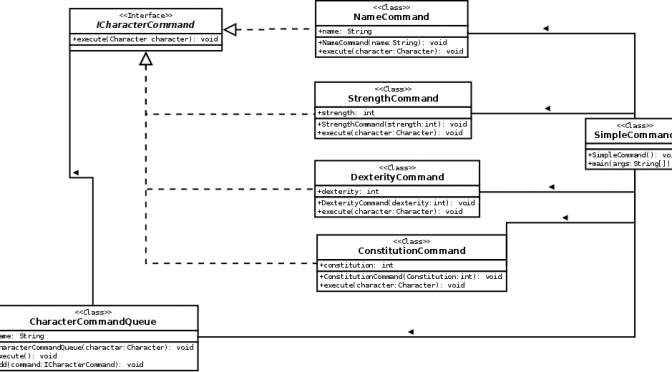
Our business rules will be that we need to create a Character with the attributes: strength, dexterity, constitution and name. Character will be our receiver. We will need to create a command for each of our attributes. Once we have our commands and receiver we will need our invoker which will manage our commands for us. Finally we will need our client application. Let’s start with our invoker, CharacterCommandManager, as shown below.
CharacterCommandManager.java
package simplecommand;
import java.util.*;

public class CharacterCommandManager {
  Character character;
  List<ICharacterCommand> commands = new ArrayList();

  public CharacterCommandManager(Character character) {
    this.character = character;
  }

  public void add(ICharacterCommand command) {
    if(commands != null) {
      commands.add(command);
    }
  }

  public void execute() {
    for(ICharacterCommand command : commands) {
      if(command != null) {
        command.execute(character);
      }
    }
  }

}
As you can see the invoker has a list to store commands and an execute method to run the commands. The constructor for this class requires a Character object.
Character.java
package simplecommand;

public class Character {
  private String name;
  private int strength;
  private int dexterity;
  private int constitution;

  public String getName() {
    return name;
  }

  public void setName(String name) {
    this.name = name;
  }

  public int getStrength() {
    return strength;
  }

  public void setStrength(int strength) {
    this.strength = strength;
  }

  public int getDexterity() {
    return dexterity;
  }

  public void setDexterity(int dexterity) {
    this.dexterity = dexterity;
  }

  public int getConstitution() {
    return constitution;
  }

  public void setConstitution(int constitution) {
    this.constitution = constitution;
  }

  public String toString() {
    return "name=" + name +
           "; strength=" + strength +
           "; dexterity=" + dexterity +
           "; constitution=" + constitution;

  }

}
Character has all the attributes that we wanted. Now we need to define an interface, ICharacterCommand, to be used by each of our commands.
ICharacterCommand.java
package simplecommand;

public interface ICharacterCommand {
  public void execute(Character character);
}
Using our interface we will define the following classes for each of our selected attributes.
StrengthCommand.java
package simplecommand;

public class StrengthCommand implements ICharacterCommand {
  private int strength;

  public StrengthCommand(int strength) {
    this.strength=strength;
  }

  public void execute(Character character) {
    if(character != null) {
      character.setStrength(strength);
    }
  }

}
DexterityCommand.java
package simplecommand;

public class DexterityCommand implements ICharacterCommand {
  private int dexterity;

  public DexterityCommand(int dexterity) {
    this.dexterity=dexterity;
  }

  public void execute(Character character) {
    if(character != null) {
      character.setDexterity(dexterity);
    }
  }

}
ConstitutionCommand.java
package simplecommand;

public class ConstitutionCommand implements ICharacterCommand {
  private int constitution;

  public ConstitutionCommand(int constitution) {
    this.constitution=constitution;
  }

  public void execute(Character character) {
    if(character != null) {
      character.setConstitution(constitution);
    }
  }

}
NameCommand.java
package simplecommand;

public class NameCommand implements ICharacterCommand {
  private String name;

  public NameCommand(String name) {
    this.name=name;
  }

  public void execute(Character character) {
    if(character != null) {
      character.setName(name);
    }
  }

  public String toString() {
    return name;
  }

}
Finally we create our client, SimpleCommand, to manage and controll all our other objects.
SimpleCommand.java
package simplecommand;

public class SimpleCommand {

  public static void main(String[] args) {
    Character character = new Character();
    CharacterCommandManager queue = new CharacterCommandManager(character);
    ICharacterCommand command = new NameCommand("Bob");
    queue.add(command);
    command = new StrengthCommand(14);
    queue.add(command);
    command = new DexterityCommand(17);
    queue.add(command);
    command = new ConstitutionCommand(10);
    queue.add(command);

    queue.execute();

    System.out.println(character);
  }
}
Now we run our SimpleCommand and we should see the following results.
SimpleCommand Results
name=Bob; strength=14; dexterity=17; constitution=10In the second part of this article we will explore a more complex implementation of the Command Design Pattern.
tags: command design pattern - design pattern - Java