Ruby on Rails Authentication and Authorization Part 2
Created: 17 February 2012 Modified:In Part 1 of this article we discussed what authentication and authorization means and what we want our security to do for us. Now it is time to configure Devise so that we can begin to customize it.
First lets create our Rails application “mysecurity” by running the command “rails new mysecurity”.
- Ruby on Rails Authentication and Authorization Part 1
- Ruby on Rails Authentication and Authorization Part 2
- Ruby on Rails Authentication and Authorization Part 3
- Ruby on Rails Authentication and Authorization Part 4
- Ruby on Rails Authentication and Authorization Part 5
- myysecurity source
- Ruby on Rails Authentication and Authorization Update 3.2
- mysecurity 3.2 source
Terminal window in a directory of your choice
bash-4.2$ rails new mysecurity
      create
      create  README
      create  Rakefile
      create  config.ru
      create  .gitignore
      create  Gemfile
      create  app
      create  app/assets/images/rails.png
      create  app/assets/javascripts/application.js
      create  app/assets/stylesheets/application.css
      create  app/controllers/application_controller.rb
      create  app/helpers/application_helper.rb
      create  app/mailers
      create  app/models
      create  app/views/layouts/application.html.erb
      create  app/mailers/.gitkeep
      create  app/models/.gitkeep
      create  config
      create  config/routes.rb
      create  config/application.rb
      create  config/environment.rb
      create  config/environments
      create  config/environments/development.rb
      create  config/environments/production.rb
      create  config/environments/test.rb
      create  config/initializers
      create  config/initializers/backtrace_silencers.rb
      create  config/initializers/inflections.rb
      create  config/initializers/mime_types.rb
      create  config/initializers/secret_token.rb
      create  config/initializers/session_store.rb
      create  config/initializers/wrap_parameters.rb
      create  config/locales
      create  config/locales/en.yml
      create  config/boot.rb
      create  config/database.yml
      create  db
      create  db/seeds.rb
      create  doc
      create  doc/README_FOR_APP
      create  lib
      create  lib/tasks
      create  lib/tasks/.gitkeep
      create  lib/assets
      create  lib/assets/.gitkeep
      create  log
      create  log/.gitkeep
      create  public
      create  public/404.html
      create  public/422.html
      create  public/500.html
      create  public/favicon.ico
      create  public/index.html
      create  public/robots.txt
      create  script
      create  script/rails
      create  test/fixtures
      create  test/fixtures/.gitkeep
      create  test/functional
      create  test/functional/.gitkeep
      create  test/integration
      create  test/integration/.gitkeep
      create  test/unit
      create  test/unit/.gitkeep
      create  test/performance/browsing_test.rb
      create  test/test_helper.rb
      create  tmp/cache
      create  tmp/cache/assets
      create  vendor/assets/stylesheets
      create  vendor/assets/stylesheets/.gitkeep
      create  vendor/plugins
      create  vendor/plugins/.gitkeep
         run  bundle install
Fetching source index for http://rubygems.org/
Using rake (0.9.2.2)
Using multi_json (1.0.4)
Using activesupport (3.1.3)
Using builder (3.0.0)
Using i18n (0.6.0)
Using activemodel (3.1.3)
Using erubis (2.7.0)
Using rack (1.3.6)
Using rack-cache (1.1)
Using rack-mount (0.8.3)
Using rack-test (0.6.1)
Using hike (1.2.1)
Using tilt (1.3.3)
Using sprockets (2.0.3)
Using actionpack (3.1.3)
Using mime-types (1.17.2)
Using polyglot (0.3.3)
Using treetop (1.4.10)
Using mail (2.3.0)
Using actionmailer (3.1.3)
Using arel (2.2.1)
Using tzinfo (0.3.31)
Using activerecord (3.1.3)
Using activeresource (3.1.3)
Using ansi (1.4.1)
Using bundler (1.0.21)
Using coffee-script-source (1.2.0)
Installing execjs (1.3.0)
Using coffee-script (2.2.0)
Using rack-ssl (1.3.2)
Installing json (1.6.5) with native extensions
Using rdoc (3.12)
Using thor (0.14.6)
Using railties (3.1.3)
Using coffee-rails (3.1.1)
Using jquery-rails (1.0.19)
Using rails (3.1.3)
Using sass (3.1.12)
Using sass-rails (3.1.5)
Using sqlite3 (1.3.5)
Using turn (0.8.3)
Installing uglifier (1.2.2)
Your bundle is complete! Use `bundle show [gemname]` to see where a bundled gem is installed.
Our RoR application framework has now been created in the directory in which you ran the command. Change into the newly created “mysecurity” directory and edit the file “Gemfile”. We are going to add the line gem ‘devise’ to the “Gemfile” file as shown below.
Gemfile in the mysecurity directory
gem 'sqlite3'

gem 'devise'
The next step is to install devise using the command rails generate devise:install which produces the result.
Terminal window in mysecurity directory
bash-4.2$ rails generate devise:install

[DEVISE] Devise.case_insensitive_keys is false which is no longer supported. If you want to continue running on this mode, please ensure you are not using validatable (you can copy the validations directly to your model) and set case_insensitive_keys to an empty array.


[DEVISE] Devise.use_salt_as_remember_token is false which is no longer supported. Devise now only uses the salt as remember token and the remember_token column can be removed from your models.


[DEVISE] Devise.reset_password_within is nil. Please set this value to an interval (for example, 6.hours) and add a reset_password_sent_at field to your Devise models (if they don't have one already).

      create  config/initializers/devise.rb
      create  config/locales/devise.en.yml

===============================================================================

Some setup you must do manually if you haven't yet:

  1. Setup default url options for your specific environment. Here is an
     example of development environment:

       config.action_mailer.default_url_options = { :host => 'localhost:3000' }

     This is a required Rails configuration. In production it must be the
     actual host of your application

  2. Ensure you have defined root_url to *something* in your config/routes.rb.
     For example:

       root :to => "home#index"

  3. Ensure you have flash messages in app/views/layouts/application.html.erb.
     For example:

<p class="notice"><%= notice %></p>

<p class="alert"><%= alert %></p>

  4. If you are deploying Rails 3.1 on Heroku, you may want to set:

       config.assets.initialize_on_precompile = false

     On config/application.rb forcing your application to not access the DB
     or load models when precompiling your assets.

===============================================================================
Following the directions of the output from the command change to the “mysecurity/config/environments” directory and add.
mysecurity/config/environments/development.rb
config.action_mailer.default_url_options = { :host => 'localhost:3000' }to the development.rb file. Change to the “mysecurity/config” directory and add the following line to the routes.rb file.
mysecurity/config/routes.rb
root :to => "home#index"Next we need to run the “rails generate devise user” followed by the “rake db:migrate” commands to build the database tables for Devise.
Terminal window in mysecurity directory
bash-4.2$ rails generate devise user
      invoke  active_record
      create    db/migrate/20120131140922_devise_create_users.rb
      create    app/models/user.rb
      invoke    test_unit
      create      test/unit/user_test.rb
      create      test/fixtures/users.yml
      insert    app/models/user.rb
       route  devise_for :users

bash-4.2$ rake db:migrate
==  DeviseCreateUsers: migrating ==============================================
-- create_table(:users)
   -> 0.0684s
-- add_index(:users, :email, {:unique=>true})
   -> 0.0384s
-- add_index(:users, :reset_password_token, {:unique=>true})
   -> 0.0005s
==  DeviseCreateUsers: migrated (0.1076s) =====================================
If we now run the “rails server” and go to the URL “http://localhost:3000/user/sign_in” we should see the results as shown below.
Terminal window in mysecurity directory
bash-4.2$ rails server
=> Booting WEBrick
=> Rails 3.1.3 application starting in development on http://0.0.0.0:3000
=> Call with -d to detach
=> Ctrl-C to shutdown server
[2012-02-17 11:35:43] INFO  WEBrick 1.3.1
[2012-02-17 11:35:43] INFO  ruby 1.9.3 (2011-10-30) [i686-linux]
[2012-02-17 11:35:43] INFO  WEBrick::HTTPServer#start: pid=5533 port=3000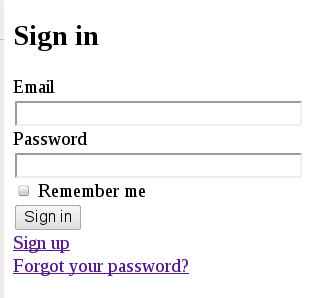
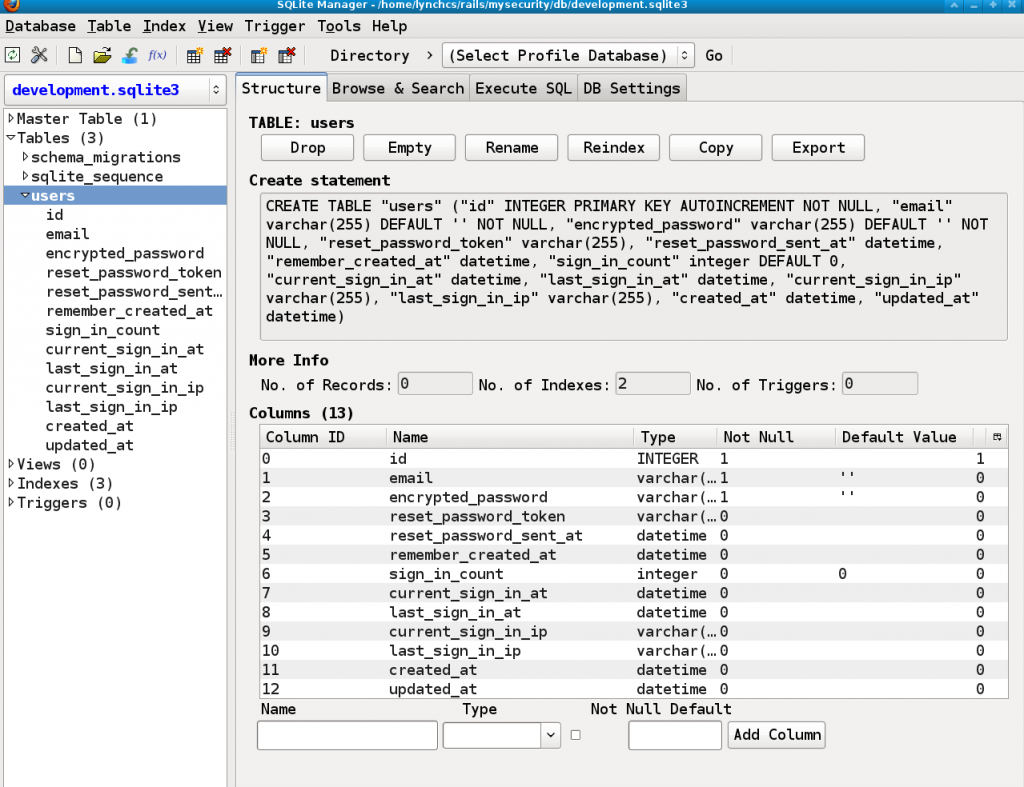
Using the Firefox add-on SQLite Manager we can also view the SQLite database development.sqlite3 located in directory mysecurity/db/. This will look similar to the below and is how I knew what fields to use in my database design in Part 1. This is illustrated in the screenshot below.
Lets press the keys “Ctrl-C” and shutdown the application server. Next we will generate view files that will allow us to customize the user interface. Go to the mysecurity folder and run the command “rails generate devise:views”. Which should deliver results similar to the following.
Terminal window in mysecurity directory
bash-4.2$ rails generate devise:views
      create  app/views/devise/_links.erb
      invoke  form_for
      create    app/views/devise/confirmations
      create    app/views/devise/confirmations/new.html.erb
      create    app/views/devise/passwords
      create    app/views/devise/passwords/edit.html.erb
      create    app/views/devise/passwords/new.html.erb
      create    app/views/devise/registrations
      create    app/views/devise/registrations/edit.html.erb
      create    app/views/devise/registrations/new.html.erb
      create    app/views/devise/sessions
      create    app/views/devise/sessions/new.html.erb
      create    app/views/devise/unlocks
      create    app/views/devise/unlocks/new.html.erb
      invoke  erb
      create    app/views/devise/mailer
      create    app/views/devise/mailer/confirmation_instructions.html.erb
      create    app/views/devise/mailer/reset_password_instructions.html.erb
      create    app/views/devise/mailer/unlock_instructions.html.erb
bash-4.2$
We have now installed and configured Devise preparing it to be customized. In Part 3 of the article we are going to modify and add files necessary to handle our hierarchical roles.
tags: RoR - Ruby - Ruby on Rails