Ruby on Rails Authentication and Authorization Part 1
Created: 1 February 2012 Modified:One of the strengths and weaknesses of Ruby on Rails (RoR) is that it requires you to setup your own authentication and authorization systems. Which I will refer to as security going forward. This makes sense seeing as RoR is a development framework rather than being a full blown content management system like Drupal. The weakness is that it takes longer to get a basic web application put together and the strength is that it gives you much greater control of your applications functionality. Working with RoR 3.1 on a Linux box I will construct a security framework. This article will require basic knowledge of Linux and to already have Ruby installed on your system.
- Ruby on Rails Authentication and Authorization Part 1
- Ruby on Rails Authentication and Authorization Part 2
- Ruby on Rails Authentication and Authorization Part 3
- Ruby on Rails Authentication and Authorization Part 4
- Ruby on Rails Authentication and Authorization Part 5
- myysecurity source
- Ruby on Rails Authentication and Authorization Update 3.2
- mysecurity 3.2 source
The requirements for security is that we want to know who is using our application and what they are allowed to access. In technical terms knowing who is requesting access is referred to as authentication. This is usually handled by a login screen. When I login to my email account authentication tells the email provider that Chris is accessing his email. Now that we know who we need to know what. What pages or resources are we going to allow our user to access. This is the portion known as authorization. After logging into my email account I try to read my email and the email provider checks to see if I am authorized to read my own email. Of course I will be able to read my own email. If however I attempt to read the lovely Joann’s email I will not be authorized to do so.
What I want in a security system is to be able to create roles and users, assign roles to user, assign roles to roles and assign roles to resources through a web interface. Straight out of the gate I think this is quite ambitious so to keep things more manageable I will only create the first three requirements and leave out being able to assign roles to resources through the interface.
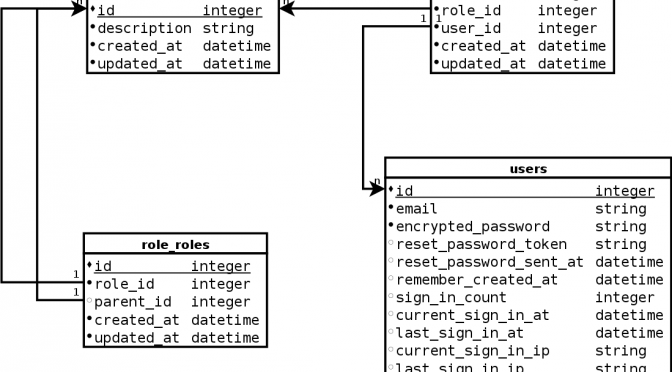
You have several options when it comes to building an security for your web application. The path I chose is to use Devise for authentication and declarative_authorization for authorization. Devise lets us know who is using our application by forcing the user to provide a username and password in order to get to the good stuff. Declarative_authorization tells us what resources (i.e. webpages) the user is allowed to access. Using knowledge of the tables created by Devise and the functionality I am looking for I created the database table design as illustrated below.
Now that we have a rough design lets install our two Ruby Gems; Devise and declarative_authorization. There are some helpful videos on Railscasts.com. Let us install them on our system by running “gem install declarative_authorization” and “gem install devise” commands in a terminal window as shown below.
Terminal window in mysecurity directory
bash-4.2$ gem install declarative_authorization
Successfully installed declarative_authorization-0.5.5
1 gem installed
Installing ri documentation for declarative_authorization-0.5.5...
Installing RDoc documentation for declarative_authorization-0.5.5...
bash-4.2$ gem install devise
Fetching: devise-2.0.0.gem (100%)
Fetching: activesupport-3.2.1.gem (100%)
Fetching: activemodel-3.2.1.gem (100%)
Fetching: rack-1.4.1.gem (100%)
Fetching: journey-1.0.1.gem (100%)
Fetching: sprockets-2.1.2.gem (100%)
Fetching: actionpack-3.2.1.gem (100%)
Successfully installed devise-2.0.0
Successfully installed activesupport-3.2.1
Successfully installed activemodel-3.2.1
Successfully installed rack-1.4.1
Successfully installed journey-1.0.1
Successfully installed sprockets-2.1.2
Successfully installed actionpack-3.2.1
7 gems installed
Installing ri documentation for devise-2.0.0...
Installing ri documentation for activesupport-3.2.1...
Installing ri documentation for activemodel-3.2.1...
Installing ri documentation for rack-1.4.1...
Installing ri documentation for journey-1.0.1...
Installing ri documentation for sprockets-2.1.2...
Installing ri documentation for actionpack-3.2.1...
Installing RDoc documentation for devise-2.0.0...
Installing RDoc documentation for activesupport-3.2.1...
Installing RDoc documentation for activemodel-3.2.1...
Installing RDoc documentation for rack-1.4.1...
Installing RDoc documentation for journey-1.0.1...
Installing RDoc documentation for sprockets-2.1.2...
Installing RDoc documentation for actionpack-3.2.1...
bash-4.2$
Now that we have the two plugins installed we can begin to customize them to our needs. The next step will be to setup Devise to be customizeable and we will walk through this in Part 2 of this article.
tags: RoR - Ruby - Ruby on Rails